Welcome to Gaia! ::


Salty Aggressor

ChelleasaurusRexx
eliza_bunnypooh
ChelleasaurusRexx

[ ]
I am so ready!

As for grouping people, availability should be a factor.


see that's why i made choosing your own groups a thing...so i wouldnt have to try to coordinate 40 or so people hahaha...and i think even if I pick the groups i'll make people captains and then they have to coordinate within their groups?

[ ]
That's a good idea. Then you won't have to manage it all by yourself.

yar. this isnt my first rodeo

Sexy Vampire

Should be good with most everything except End Boss, personally ^^

Organic Tea's Princess

Tipsy Smoker

12,100 Points
  • Team Edward 100
  • Super Tipsy 200
  • Married 100
http://www.gaiaonline.com/forum/zomg-discussion/zomg-guides-and-resources/t.48042715/

A link to all the guides that were approved for ZOMG. Maybe you guys want to go back through them all?

craigslist's Rival

Wealthy Millionaire

IM VERY EXCITED!!!

Tipsy Glitch

eliza_bunnypooh

      i feel like i need to pull out..
      its my exam week and my internet having a
      serious superslow speed connection problem User Image


Salty Aggressor

What Happens At Night
http://www.gaiaonline.com/forum/zomg-discussion/zomg-guides-and-resources/t.48042715/

A link to all the guides that were approved for ZOMG. Maybe you guys want to go back through them all?

why would I do that?

Salty Aggressor

tsupii
eliza_bunnypooh

      i feel like i need to pull out..
      its my exam week and my internet having a
      serious superslow speed connection problem User Image


let me know if you want to come back at a later time :0

Tipsy Glitch

eliza_bunnypooh
tsupii
eliza_bunnypooh

      i feel like i need to pull out..
      its my exam week and my internet having a
      serious superslow speed connection problem User Image
      oh yes pls i would love to User Image
      i'll let you know User Image

let me know if you want to come back at a later time :0

Elyass's Husbando

Offensive Duck

16,325 Points
  • Flatterer 200
  • Tycoon 200
  • Profitable 100
can help if you want me senpai

Receiver

I'll help out a bit!

Salty Aggressor

-Lustful_Lullabies-
I'll help out a bit!
cool

networkz's Wife

Wicked Whiz

Count me in 3nodding

Ruthless Leader

30,525 Points
  • Hunter 50
  • Survivor 150
  • Megathread 100
eliza_bunnypooh
Hellooooooo people who have volunteered to help test s**t for guides. I've updated the third post on first page with some info for the first round of research collection. I've also added a new poll that will be active for 1 day...please do the poll and post if you have anything to add or have questions/comments
***let me know if you would like to be removed from the list of summons***


Here is a copy of the guide I created for Village Greens so far:


Village Greens is the first place you'll come to in zOMG! Here, Leon is standing next to Dina, and apparently, my old arch-nemesis, Jinn Parien has gotten past the first two screens and is ready to talk to Leon. How can you tell that Leon "wants" to talk to Jinn? Leon has exclamation points in a word bubble over his head. This means that an NPC has something to say to you. When you hover over an NPC, tiny little gears will pop up much like they did in the first screen when you were supposed to open the chest to get your first ring. When you click on Leon, he will begin speaking to you.

User Image


After you are done clicking OK on Leon's conversation, he will give you a quest. This is the beginning of a quest thread.


User Image

Fantastic! Now your open quests book is gold! That means you have to complete the quest. Do what the NPC told you to do, and go back to him. Maybe he will give you a reward.

If you're new to zOMG!, this whole thing may seem to be a bit overwhelming. So many buttons to click, things turning gold, little blue and gray dots hanging out with the number 0 all on them. Here's an explanation to all of it:

User Image


The box on the left is called a PDA. For those of you who do not know what that is, I'll explain. Back in the days before iphones, there was this little device people dragged around with them called a personal digital assistant. They called this device a PDA for short. It doesn't matter what it's called, really, but it does matter that this thing is very helpful when keeping track of where you are on the map and what quests you may have.


1: The open book image on the left is where your open quests will be. Some NPC's will give you quests early in the game which you will not be able to complete until much later. This little book keeps track of those quests.
2: The closed book next to it is the completed quests book. This book turns gold when you've completed a quest. Sometimes, this book will turn gold when you complete a quest which you didn't even know you had. For instance, when you kill a certain amount of the animated, you will earn a badge. This book will let you know when that occurs.
3: The picture of the world with a magnifying glass on it is how you toggle back to the area map after you click the world map. Currently pictured is the area map. You'll notice that Jinn's map is all in black. That's because Jinn has just now started zOMG! and has yet to explore the entire area. As he explores, the map will open up and stay open.
4: The picture of the world is called the world map. When you click on this, you will see the entire completed world of zOMG! There will be red flags and white dice all over it.
The white dice signify your ability to gather a free item or gold from the NPC. Just talk to Dina, and she'll give you a free item.
5: The red flags on the map mean that you have a quest available in the area of the map where the flag is located.
6: The red ball will be the location on the map where the other members of your crew are. You can have a crew of up to 6 people, including yourself.
7: The blue ball shows you where a friend you have made on Gaia is located.
8: That last little yellow thing is the button to toggle centering the map. When your little yellow ball which signifies your position on the map seems to go way off, click this thing and the yellow ball will end up in the proper place.


Below the PDA is the chat box. You'll notice that everything Leon or any other NPC says to you is in green. Sometimes, they'll say it out loud so everybody will see it who is in the same area. Like when you click on Dina to get the daily chance, her last statement will end up in white.
You'll notice that there's a little box that says TALK when you first start the game. If you click on the word TALK, the chat box will give you other options.
Stay on TALK if you want to keep the conversation inside the area you are in.
Click on SHOUT to talk to the entire area of the map, in this case, Village Greens. When you click SHOUT, all of Village Greens will see what you have to say.
Click on CREW to talk to only those people who are in your crew.
Click on CLAN to talk to anybody else who is on zOMG! and is in your clan.
Click on WHISPER to whisper to only one other person who is on zOMG! at the time. When you click on WHISPER, there will be a box for you to put the username in. Make sure you type the username exactly as it appears on the rest of Gaia, or it will give you an error message.

You can also click on an individual in your crew or next to you in the same area and click on the drop-down arrow on the bottom-right of their box, and whisper them this way. If somebody whispers to you, the words will show up in bright purple in your chat box. To instantly reply to a whisper, press the backspace button on your keyboard. This will enable you to whisper to the last person who whispered to you. To talk, shout, or speak to your crew, make sure that option is chosen, and simply hit the enter button on your keyboard to do so.


On the top of your screen, you will see the name of the area you are in. Jinn is in Village Greens.
Next to that, you will see the name of the server you are in. This will be important to know in the future. Jinn is on the Anchor Bug server.
The gray ball with the zero next to it is called a shadow orb. Shadow orbs can only be obtained in Deadman's Shadow, which is the area of zOMG! this guild intends to train you for. These are the orbs you will need to attain a level beyond 10.0.
The purple ball with the zero next to it is called an orb. You can earn normal orbs throughout each area of zOMG! by defeating the animated, completing quests, or simply by finding them lying around.
The ring on fire next to this is your Current Level, or CL. Jinn is still a level 1.0, so it will be quite a while for him to be able to catch me in zOMG!


9: This button with the picture of 3 people on it opens your crew panel. The panel will have everybody on your crew open in it where you can see their CL, and open their drop-down box. You may want to move your crew panel to wherever is the most comfortable for you. You may also click this to close your crew panel.
10: This comic-style word bubble opens or closes your chat box so you can see what everybody has said in the last little bit. If you close this box, the chat will appear above this control panel bar approximately in the same area where the word bubble is.
11: This picture is of a PDA. This will open or close your PDA, thus, closing or opening your map.
12: The picture of the bathroom-man is how you kneel or stand. Click it to kneel. Click it again to stand. Kneeling helps you regain health at a faster rate, but also makes you more vulnerable to attacks from the animated. You will receive significantly more damage per hit if you are hit while kneeling. However, if there are no animated around, feel free to rest.
13: This red arrow opens up your power-up and buddy slots. Like the ringslots below it, there will be 8 empty spaces until you acquire buddies and/or power-ups.
14: These are your ring slots. Jinn Parien only has one ring equipped. He is a weak Jedi. He is no match for me. Anyway, each number on your keyboard coincides with the rings in your ringslots by the default settings. Therefore, if Jinn wanted to use the Guns, Guns, Guns ring on an animated, he could do so by pressing the 1 button on his keyboard.
15: This white bag opens up a screen over your PDA which will show you your other rings. When you have the arrow from 13 clicked, it will also open up another screen over your PDA which will show you what power-ups or buddies you can equip.
16: This is you health meter. As you receive damage from the animated, this meter will go down. If it goes all the way down to 0, you will become dazed.
17: This is your stamina meter. As you make your attacks, this meter will begin to drop. When it reaches 0, your rings will turn dark and you will be unable to use them. Kneeling helps your stamina to increase as well as your health.
18: This is your Ghi meter. Ghi is Gaia's version of lifeforce energy, or to put it in Sith terms, one's connection to the living Force. Your Ghi determines your character's ability to dodge faster, regain health faster, regain stamina faster, gain higher levels of health, luck in item drops, and etc. You can gain higher Ghi by going to Barton Town, hanging out in a heavily-populated area of zOMG!, or staying in a crew for a period of time.
19: This is your rage meter. It starts out gray and as you successfully use your rings, begins to move up. You'll notice there are three blocks within the meter. When all of the blocks are filled and there is no gray left in the meter, you have what's called full rage or r4. You can use full rage on your rings by holding the corresponding button down until the red bar becomes fully light-red in color. When you let go, the ring will give a full rage effect of it's particular ability. When that happens, you'll also notice that the animation of your ring's ability changes as well. Using any amount of rage within the first block is called r1. After the first line, and into the second block is called r2. After the second line and into the third block is called r3. So, when somebody in your crew says r4, they mean for you to hold down the ring's corresponding button until the entire bar is full of light-red, and then let go on what you have targeted.
20: This is zOMG!'s control panel menu. You can use this menu to get game help, lower your level, (yeah there will be times when you'll want to do that), go to the zOMG! store Back Alley Bargains, (which is also available by clicking the SHOP button on the top-right of your screen), report abuse, open your music player, or change your game options. You will be able to see which keys on your keyboard cause you to do certain things.


Head above Leon and Dina into the next screen by either using your mouse to click on the brass-colored arrow which will appear when scrolling to the top of your play-screen, or use your keyboard's arrows.

User Image


Here's Jinn standing next to Elizabeth, admiring the flamingos and lawn gnomes he must defeat. Take note of where Elizabeth is on the map, you'll be asked to talk to her later.

Target the gnomes and flamingos by either clicking on them with your mouse arrow, (not recommended) or by pressing the ~ button on your keyboard, (my preferred choice) or by pressing Q on your keyboard.

Attack the gnomes and flamingos by either double-clicking them with your mouse, (really this mouse stuff is for the birds, (no pun intended)) or by pressing the number 1 on your keyboard, (see, right there next to the ~? That's why it's my preferred choice).

As you defeat the lawn gnomes and the flamingos, red words will pop up telling you of your progress.

User Image


On your PDA, there will now be a red flag signifying that you have an NPC you need to talk to. The red flag is on Leon now because he wants to talk to you about completing his tasks. Go back down to Leon. See? He has the red exclamation points over his head.

User Image


After discussing your eligibility to serve Gaia, Leon will tell you to go talk to Elizabeth and he also gives you some rewards. Your active quests book and your completed quests book will both turn gold. Notice how you have a number besides 0 next to your orb counter? Nice, huh? Another red flag will show up on your PDA, and you will have to go up once again to speak with Elizabeth. Elizabeth will mark the null chamber on your map and give you some orbs to upgrade your ring with. Head north to the null chamber which she will mark with yet another red flag on your PDA.

User Image


So, now we've walked you through the first couple of steps little by little, and you should at least have a basic understanding of your default keys and how to target and defeat monsters. Now let's talk about a few more important things you may need to know:

All of the animated will drop rings, loot, and gold if your level is close to their level. For example, if you're out defeating level 1.2 Lawn Gnomes, and you're a level 6, you will get no loot, gold, or rings as a reward for your efforts. The only reward you will receive is knowing you defeated a poor defenseless animated in cold blood, which, HEY, that's good enough for me. However, it does not help you level up and it does not get you random rings, items, or gold drops.

When targeting an animated, what color is it? I know that sounds kind of like a stupid question, like, "Hey, Darth Daddicus, I'm pretty sure the pink flamingo is pink!", but it's a very serious question which may save you some time or from making a trip to the null chamber.

If a target is purple:
User Image
This means that the animated is too low of a level for you to be fooling with. You can still attack it, but you will receive no rewards for your pointless endeavors.

If a target is blue:
User Image
This means that the animated is a lower level than you and would rather you picked on somebody your own level, you big bully.
Blue targets still give drops, but not as much.

If a target is green:
User Image
This means that the animated is a perfect challenge for you.
This target will give you the maximum amount of drops when defeated.

If a target is yellow:
User Image
This means that the animated is a little bit stronger than you and you should proceed with caution if you choose to attack it.
This target will still give you drops, but be careful when confronting them. They may defeat you if there are a large number of them and they gang up on you.

If a target is red:
User Image
This means that the animated can most likely defeat you in one hit. You should avoid these targets until you are stronger or you have a whole crew working to defeat the target and an adequate amount of buffs.


The animated in the area of Village Greens:

Goof Greens Fluff
User Image
These little fellers can be found in the north-west and west of Village Greens. As do all animated, they will drop rings, loot, and gold


Sandtrap Fluff
User Image
These little guys can also be found in the north-west and western part of Village Greens. They are quite aggressive and will come chasing after you if they think they can gang up on you and destroy you.


Pink Flamingo
User Image
These guys can be found all over Village Greens at different levels. They are normally not aggressive until you begin attacking them first. They are also little tattle-tales that will tell a group of fellow animated that you are nearby so that a horde of animated come over from another screen and mob up on you.


Lawn Gnome (Including Corporal Punishment)
User Image
These guys can also be found all around Village Greens. They will attempt to gang up on you much like the sandtrap fluffs. Once you defeat the Majors, a quest to complete in this area, they will form a roving band bent on vigilante justice determined to defeat you.


Lawn Gnome Courier
User Image
This guy spawns down in the south of Village Greens and quickly runs up to the different Gnome Majors with a difficult to decipher secret gnome battle code.


Lawn Gnome Adjutant (Including the Majors)
User Image
These guys are aggressive and will try to attack you and are normally surrounded by a group of lawn gnomes because they're too spineless and cowardly to face you alone. That's why they're yellow.


Mushroom Cannons
User Image
These things just sit still and only attack you when you're close enough within their range of fire.


GENERAL MAYHEM!

User Image


This is General Mayhem. To enter his quarters, you'll need to go down to the south-west corner of the map to the large purple mushroom. Choose the difficulty setting for the encounter, and enter. If you choose HARD, you will get more drops and loot for your efforts. The lower level of difficulty you choose, the less drops, loot, and rings you will receive. When choosing the HARD difficulty setting, try to recrewt some friends to help you. If you are going in to the General's Quarters and your level is too high, the game will automatically adjust your level to 2.5. When the screen changes and you're sucked into the giant purple mushroom and out of the Village Greens, this is referred to as an Instance.

There are several quests available in Village Greens which you will receive an award for completing. There are two rings you will receive for quest completion in Village Greens. One is the Bandage ring and one is a ring you will choose on your own. The quests are all a part of what's called a QUEST CHAIN, meaning that you must complete them in the order in which you receive them. Such as, if you defeat the Lawn Gnome Majors in the An Advancing Enemy quest, well, too bad, you don't get credit for it until you have the Balance Of Power quest unlocked.

Flamingo Trial:
Just defeat five Pink Flamingos anywhere in Village Greens. Pretty easy to do. As a matter of fact, that was part of the walk-through you were given in the above post.

Gnome Trial:
Same as the above. You can find the easiest Pink Flamingos and Lawn Gnomes right above Leon. You should be able to defeat five of each animated without any problem.

Finding Elizabeth:
We also discussed this in the above post. Yes, you get rewards for nearly every little thing you do in Village Greens. Isn't that nice for the beginner?

Upgrade Your Ring:
For this, you will have to go to the Null Chamber and use the orbs on one of your rings to upgrade it. More on this procedure in the Null Chamber thread.

An Advancing Enemy:
For this, Leon asks you to scout out the Lawn Gnome encampments. There are three of them which will have red flags on your map on the PDA. On your map, they are the yellow, blue, and orange mushrooms directly to the west, (or left), of Leon and Dina.

Gnomish Battle Plans
Leon is convinced that the Lawn Gnomes are planning an attack and asks you to go get the little blue gnome that seems to be carrying messages back and forth from Gnome Man's Land to the various Gnome Majors and retrieve the notes he seems to be carrying. The little red flag will pop up again on the map at the likeliest location of the next Lawn Gnome Courier. Defeat the Lawn Gnome Courier, and return to Leon.

A Call To Arms
Leon asks you to go up to Barton Town to show Lieutenant Clara the alleged battle plans you have recently taken from the bleeding corpse of the Lawn Gnome Courier. Head to the North-eastern corner of Village Greens, and you will see an archway which you can activate by clicking on it with your mouse. Click it and it will take you into Barton Town. I know there are a lot of red question marks and flags floating around in that darkness, but just try to focus on why you're here in Barton Town and speak with Clara. After Clara questions Leon's intellectual capacity and discounts the battle plans you risked life and limb for as nothing more than mere crayon doodles, go back to Leon and give him the news. Break it to him easy.

Balance Of Power
In this one, Leon asks you to defeat the Lawn Gnome Majors. They are Major Catastrophe, Major Tragedy, and Major Disaster. They are the yellow gnomes you should have seen at each of the camps you scouted when doing the An Advancing Enemy quest. Once you defeat them and go back to Leon to tell him of your success, there will be a vigilante group of Lawn Gnomes bent on avenging their fallen Majors.

Remo
In this quest, Leon asks you to find Remo, one of the Barton Regulars. He is located to the left and down against the wall separating the Towns from Village Greens. What do you know? Remo apparently has no faith in Commander Leon as you quickly find out when he decides to put you through a test of his own. You get the idea that maybe Leon got his job from being the nephew, of a cousin, of an aunt, twice-removed by now? Me too.

Flamingo Hunt
Not too difficult as there are several squads of these fellas hanging out directly south of Remo. Just kill 10 of these and head back.

Shroom Heads
A little bit more difficult then the last one because this quest wants you to get a certain number of drops from the Mushroom Cannons instead of just killing a certain amount of them. However many Mushroom Cannons it's going to take varies. The best way to get this completed in a timely fashion is to lower your level to at least 1.7 if it's already higher than that and go defeat as many Mushroom Cannons as it takes until you get all of the mushroom heads.

Behind Enemy Lines
In this quest, you are sent to defeat the Lawn Gnome General. Currently, the normal setting is broken and the General will not attack you so you can finish the quest, so choose either HARD or easy. If you're in this guild, you will choose HARD if you know what's good for you. For this, you'll want to get a crew together to help spread out the damage dealt to each of you. If you have buffs at this time, use them. Once you defeat the Lawn Gnome General, you will be able to select a ring from Remo for your troubles.

Rings to choose from:
Bump
Slash
Fire Rain
Hornet's Nest
Hot Foot
Solar Rays
Coyote Spirit
Fitness
Keen Aye
Quicksand
Taunt
Pot Lid
Teflon Spray
Bandage (Which Leon should have given you by now anyways)
Diagnose
Meat
Wish

Lost Larry
This is where Remo wants you to go find Larry in Bill's Ranch. The game is attempting to tell you that you are now ready for the next level. If you've spent enough time in Village Greens and got yourself plenty of ring drops and orbs to level them up, then maybe you are. However, that's not where I'm going to send you. Up to the north of Village Greens, where you met Lieutenant Clara, is Barton Town. There are many different areas of Barton Town you need to explore before moving on because the NPC's of Barton Town have many quests to give you which you are going to be able to complete as you got through the rest of the game.
However, if you wish to anger me and feel my wrath, please, feel free to go to the southwest corner of Village Greens and exit through where the sidewalk ends into Bill's Ranch. I will be very disappointed if you did, but hey, it's quite alright to anger an evil Sith lord bent on galactic domination, right?


Well, we've finally explored all of Village Greens and have revealed the map. The numbers are written to show you the level of each cluster of enemies in that area.


User Image

Gambino Zealot

14,150 Points
  • Perfect Attendance 400
  • Lavish Tipper 200
  • Bunny Hoarder 150
eliza_bunnypooh
UPDATE 3/12
I think I'll just assign everyone on my list to a permanent group for the duration of testing? or if people don't like that - yall can make your own groups and report data either way. I will either make a data thread for people to post their findings, have people post here, or have people pm me...hmm....................

...................First up for zOMG relaunch week 1 (possibly later?)
-> quickest ways to finish rounds of smeb/ps/kat's doll/etc (test different strategies/ringsets as extensively as possible)
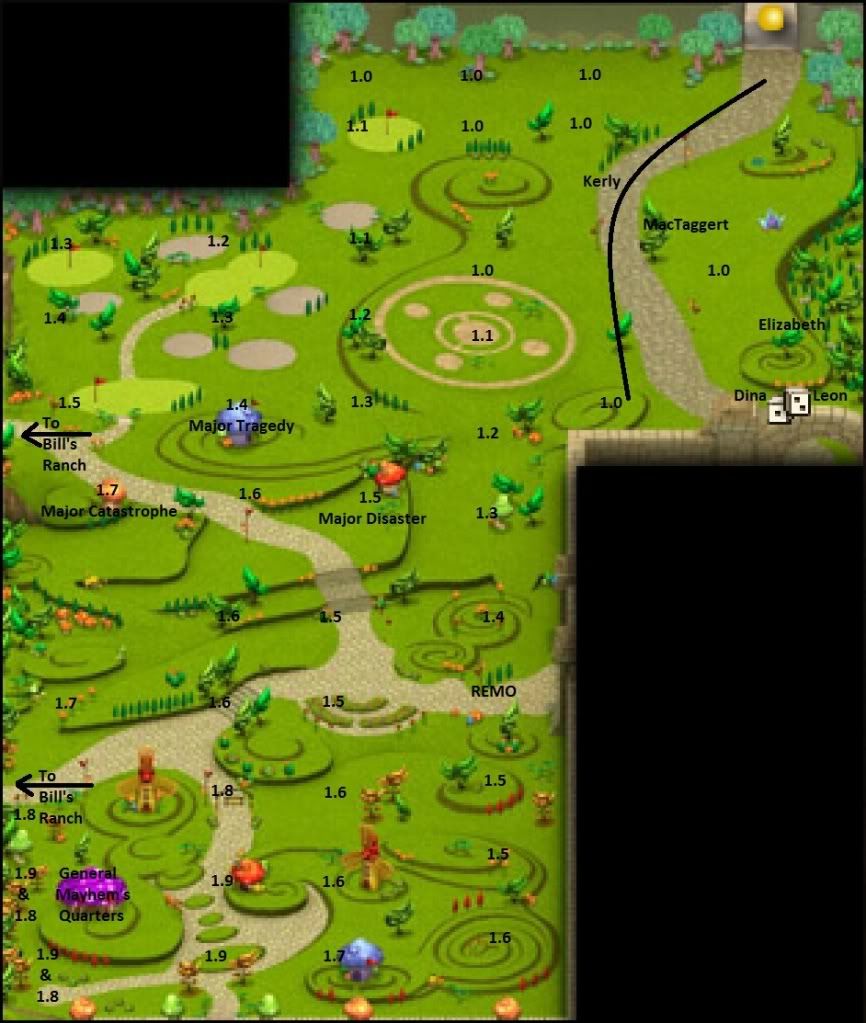
-> test which farm grounds generate quickest payouts (Tiny Terror Farming/gnome farming/sandfluff farming/etc)
-> determine which of the above generate the most gold per effort put into the activity


You should probably collect availability hours. For instance, I'm on Eastern Standard time and I can only play at either the a** crack of dawn, or after work (10:30pm Est) M-F. Sat&Sun I'm available at any time.

Salty Aggressor

Darth Daddicus
eliza_bunnypooh
Hellooooooo people who have volunteered to help test s**t for guides. I've updated the third post on first page with some info for the first round of research collection. I've also added a new poll that will be active for 1 day...please do the poll and post if you have anything to add or have questions/comments
***let me know if you would like to be removed from the list of summons***


Here is a copy of the guide I created for Village Greens so far:


Village Greens is the first place you'll come to in zOMG! Here, Leon is standing next to Dina, and apparently, my old arch-nemesis, Jinn Parien has gotten past the first two screens and is ready to talk to Leon. How can you tell that Leon "wants" to talk to Jinn? Leon has exclamation points in a word bubble over his head. This means that an NPC has something to say to you. When you hover over an NPC, tiny little gears will pop up much like they did in the first screen when you were supposed to open the chest to get your first ring. When you click on Leon, he will begin speaking to you.

User Image


After you are done clicking OK on Leon's conversation, he will give you a quest. This is the beginning of a quest thread.


User Image

Fantastic! Now your open quests book is gold! That means you have to complete the quest. Do what the NPC told you to do, and go back to him. Maybe he will give you a reward.

If you're new to zOMG!, this whole thing may seem to be a bit overwhelming. So many buttons to click, things turning gold, little blue and gray dots hanging out with the number 0 all on them. Here's an explanation to all of it:

User Image


The box on the left is called a PDA. For those of you who do not know what that is, I'll explain. Back in the days before iphones, there was this little device people dragged around with them called a personal digital assistant. They called this device a PDA for short. It doesn't matter what it's called, really, but it does matter that this thing is very helpful when keeping track of where you are on the map and what quests you may have.


1: The open book image on the left is where your open quests will be. Some NPC's will give you quests early in the game which you will not be able to complete until much later. This little book keeps track of those quests.
2: The closed book next to it is the completed quests book. This book turns gold when you've completed a quest. Sometimes, this book will turn gold when you complete a quest which you didn't even know you had. For instance, when you kill a certain amount of the animated, you will earn a badge. This book will let you know when that occurs.
3: The picture of the world with a magnifying glass on it is how you toggle back to the area map after you click the world map. Currently pictured is the area map. You'll notice that Jinn's map is all in black. That's because Jinn has just now started zOMG! and has yet to explore the entire area. As he explores, the map will open up and stay open.
4: The picture of the world is called the world map. When you click on this, you will see the entire completed world of zOMG! There will be red flags and white dice all over it.
The white dice signify your ability to gather a free item or gold from the NPC. Just talk to Dina, and she'll give you a free item.
5: The red flags on the map mean that you have a quest available in the area of the map where the flag is located.
6: The red ball will be the location on the map where the other members of your crew are. You can have a crew of up to 6 people, including yourself.
7: The blue ball shows you where a friend you have made on Gaia is located.
8: That last little yellow thing is the button to toggle centering the map. When your little yellow ball which signifies your position on the map seems to go way off, click this thing and the yellow ball will end up in the proper place.


Below the PDA is the chat box. You'll notice that everything Leon or any other NPC says to you is in green. Sometimes, they'll say it out loud so everybody will see it who is in the same area. Like when you click on Dina to get the daily chance, her last statement will end up in white.
You'll notice that there's a little box that says TALK when you first start the game. If you click on the word TALK, the chat box will give you other options.
Stay on TALK if you want to keep the conversation inside the area you are in.
Click on SHOUT to talk to the entire area of the map, in this case, Village Greens. When you click SHOUT, all of Village Greens will see what you have to say.
Click on CREW to talk to only those people who are in your crew.
Click on CLAN to talk to anybody else who is on zOMG! and is in your clan.
Click on WHISPER to whisper to only one other person who is on zOMG! at the time. When you click on WHISPER, there will be a box for you to put the username in. Make sure you type the username exactly as it appears on the rest of Gaia, or it will give you an error message.

You can also click on an individual in your crew or next to you in the same area and click on the drop-down arrow on the bottom-right of their box, and whisper them this way. If somebody whispers to you, the words will show up in bright purple in your chat box. To instantly reply to a whisper, press the backspace button on your keyboard. This will enable you to whisper to the last person who whispered to you. To talk, shout, or speak to your crew, make sure that option is chosen, and simply hit the enter button on your keyboard to do so.


On the top of your screen, you will see the name of the area you are in. Jinn is in Village Greens.
Next to that, you will see the name of the server you are in. This will be important to know in the future. Jinn is on the Anchor Bug server.
The gray ball with the zero next to it is called a shadow orb. Shadow orbs can only be obtained in Deadman's Shadow, which is the area of zOMG! this guild intends to train you for. These are the orbs you will need to attain a level beyond 10.0.
The purple ball with the zero next to it is called an orb. You can earn normal orbs throughout each area of zOMG! by defeating the animated, completing quests, or simply by finding them lying around.
The ring on fire next to this is your Current Level, or CL. Jinn is still a level 1.0, so it will be quite a while for him to be able to catch me in zOMG!


9: This button with the picture of 3 people on it opens your crew panel. The panel will have everybody on your crew open in it where you can see their CL, and open their drop-down box. You may want to move your crew panel to wherever is the most comfortable for you. You may also click this to close your crew panel.
10: This comic-style word bubble opens or closes your chat box so you can see what everybody has said in the last little bit. If you close this box, the chat will appear above this control panel bar approximately in the same area where the word bubble is.
11: This picture is of a PDA. This will open or close your PDA, thus, closing or opening your map.
12: The picture of the bathroom-man is how you kneel or stand. Click it to kneel. Click it again to stand. Kneeling helps you regain health at a faster rate, but also makes you more vulnerable to attacks from the animated. You will receive significantly more damage per hit if you are hit while kneeling. However, if there are no animated around, feel free to rest.
13: This red arrow opens up your power-up and buddy slots. Like the ringslots below it, there will be 8 empty spaces until you acquire buddies and/or power-ups.
14: These are your ring slots. Jinn Parien only has one ring equipped. He is a weak Jedi. He is no match for me. Anyway, each number on your keyboard coincides with the rings in your ringslots by the default settings. Therefore, if Jinn wanted to use the Guns, Guns, Guns ring on an animated, he could do so by pressing the 1 button on his keyboard.
15: This white bag opens up a screen over your PDA which will show you your other rings. When you have the arrow from 13 clicked, it will also open up another screen over your PDA which will show you what power-ups or buddies you can equip.
16: This is you health meter. As you receive damage from the animated, this meter will go down. If it goes all the way down to 0, you will become dazed.
17: This is your stamina meter. As you make your attacks, this meter will begin to drop. When it reaches 0, your rings will turn dark and you will be unable to use them. Kneeling helps your stamina to increase as well as your health.
18: This is your Ghi meter. Ghi is Gaia's version of lifeforce energy, or to put it in Sith terms, one's connection to the living Force. Your Ghi determines your character's ability to dodge faster, regain health faster, regain stamina faster, gain higher levels of health, luck in item drops, and etc. You can gain higher Ghi by going to Barton Town, hanging out in a heavily-populated area of zOMG!, or staying in a crew for a period of time.
19: This is your rage meter. It starts out gray and as you successfully use your rings, begins to move up. You'll notice there are three blocks within the meter. When all of the blocks are filled and there is no gray left in the meter, you have what's called full rage or r4. You can use full rage on your rings by holding the corresponding button down until the red bar becomes fully light-red in color. When you let go, the ring will give a full rage effect of it's particular ability. When that happens, you'll also notice that the animation of your ring's ability changes as well. Using any amount of rage within the first block is called r1. After the first line, and into the second block is called r2. After the second line and into the third block is called r3. So, when somebody in your crew says r4, they mean for you to hold down the ring's corresponding button until the entire bar is full of light-red, and then let go on what you have targeted.
20: This is zOMG!'s control panel menu. You can use this menu to get game help, lower your level, (yeah there will be times when you'll want to do that), go to the zOMG! store Back Alley Bargains, (which is also available by clicking the SHOP button on the top-right of your screen), report abuse, open your music player, or change your game options. You will be able to see which keys on your keyboard cause you to do certain things.


Head above Leon and Dina into the next screen by either using your mouse to click on the brass-colored arrow which will appear when scrolling to the top of your play-screen, or use your keyboard's arrows.

User Image


Here's Jinn standing next to Elizabeth, admiring the flamingos and lawn gnomes he must defeat. Take note of where Elizabeth is on the map, you'll be asked to talk to her later.

Target the gnomes and flamingos by either clicking on them with your mouse arrow, (not recommended) or by pressing the ~ button on your keyboard, (my preferred choice) or by pressing Q on your keyboard.

Attack the gnomes and flamingos by either double-clicking them with your mouse, (really this mouse stuff is for the birds, (no pun intended)) or by pressing the number 1 on your keyboard, (see, right there next to the ~? That's why it's my preferred choice).

As you defeat the lawn gnomes and the flamingos, red words will pop up telling you of your progress.

User Image


On your PDA, there will now be a red flag signifying that you have an NPC you need to talk to. The red flag is on Leon now because he wants to talk to you about completing his tasks. Go back down to Leon. See? He has the red exclamation points over his head.

User Image


After discussing your eligibility to serve Gaia, Leon will tell you to go talk to Elizabeth and he also gives you some rewards. Your active quests book and your completed quests book will both turn gold. Notice how you have a number besides 0 next to your orb counter? Nice, huh? Another red flag will show up on your PDA, and you will have to go up once again to speak with Elizabeth. Elizabeth will mark the null chamber on your map and give you some orbs to upgrade your ring with. Head north to the null chamber which she will mark with yet another red flag on your PDA.

User Image


So, now we've walked you through the first couple of steps little by little, and you should at least have a basic understanding of your default keys and how to target and defeat monsters. Now let's talk about a few more important things you may need to know:

All of the animated will drop rings, loot, and gold if your level is close to their level. For example, if you're out defeating level 1.2 Lawn Gnomes, and you're a level 6, you will get no loot, gold, or rings as a reward for your efforts. The only reward you will receive is knowing you defeated a poor defenseless animated in cold blood, which, HEY, that's good enough for me. However, it does not help you level up and it does not get you random rings, items, or gold drops.

When targeting an animated, what color is it? I know that sounds kind of like a stupid question, like, "Hey, Darth Daddicus, I'm pretty sure the pink flamingo is pink!", but it's a very serious question which may save you some time or from making a trip to the null chamber.

If a target is purple:
User Image
This means that the animated is too low of a level for you to be fooling with. You can still attack it, but you will receive no rewards for your pointless endeavors.

If a target is blue:
User Image
This means that the animated is a lower level than you and would rather you picked on somebody your own level, you big bully.
Blue targets still give drops, but not as much.

If a target is green:
User Image
This means that the animated is a perfect challenge for you.
This target will give you the maximum amount of drops when defeated.

If a target is yellow:
User Image
This means that the animated is a little bit stronger than you and you should proceed with caution if you choose to attack it.
This target will still give you drops, but be careful when confronting them. They may defeat you if there are a large number of them and they gang up on you.

If a target is red:
User Image
This means that the animated can most likely defeat you in one hit. You should avoid these targets until you are stronger or you have a whole crew working to defeat the target and an adequate amount of buffs.


The animated in the area of Village Greens:

Goof Greens Fluff
User Image
These little fellers can be found in the north-west and west of Village Greens. As do all animated, they will drop rings, loot, and gold


Sandtrap Fluff
User Image
These little guys can also be found in the north-west and western part of Village Greens. They are quite aggressive and will come chasing after you if they think they can gang up on you and destroy you.


Pink Flamingo
User Image
These guys can be found all over Village Greens at different levels. They are normally not aggressive until you begin attacking them first. They are also little tattle-tales that will tell a group of fellow animated that you are nearby so that a horde of animated come over from another screen and mob up on you.


Lawn Gnome (Including Corporal Punishment)
User Image
These guys can also be found all around Village Greens. They will attempt to gang up on you much like the sandtrap fluffs. Once you defeat the Majors, a quest to complete in this area, they will form a roving band bent on vigilante justice determined to defeat you.


Lawn Gnome Courier
User Image
This guy spawns down in the south of Village Greens and quickly runs up to the different Gnome Majors with a difficult to decipher secret gnome battle code.


Lawn Gnome Adjutant (Including the Majors)
User Image
These guys are aggressive and will try to attack you and are normally surrounded by a group of lawn gnomes because they're too spineless and cowardly to face you alone. That's why they're yellow.


Mushroom Cannons
User Image
These things just sit still and only attack you when you're close enough within their range of fire.


GENERAL MAYHEM!

User Image


This is General Mayhem. To enter his quarters, you'll need to go down to the south-west corner of the map to the large purple mushroom. Choose the difficulty setting for the encounter, and enter. If you choose HARD, you will get more drops and loot for your efforts. The lower level of difficulty you choose, the less drops, loot, and rings you will receive. When choosing the HARD difficulty setting, try to recrewt some friends to help you. If you are going in to the General's Quarters and your level is too high, the game will automatically adjust your level to 2.5. When the screen changes and you're sucked into the giant purple mushroom and out of the Village Greens, this is referred to as an Instance.

There are several quests available in Village Greens which you will receive an award for completing. There are two rings you will receive for quest completion in Village Greens. One is the Bandage ring and one is a ring you will choose on your own. The quests are all a part of what's called a QUEST CHAIN, meaning that you must complete them in the order in which you receive them. Such as, if you defeat the Lawn Gnome Majors in the An Advancing Enemy quest, well, too bad, you don't get credit for it until you have the Balance Of Power quest unlocked.

Flamingo Trial:
Just defeat five Pink Flamingos anywhere in Village Greens. Pretty easy to do. As a matter of fact, that was part of the walk-through you were given in the above post.

Gnome Trial:
Same as the above. You can find the easiest Pink Flamingos and Lawn Gnomes right above Leon. You should be able to defeat five of each animated without any problem.

Finding Elizabeth:
We also discussed this in the above post. Yes, you get rewards for nearly every little thing you do in Village Greens. Isn't that nice for the beginner?

Upgrade Your Ring:
For this, you will have to go to the Null Chamber and use the orbs on one of your rings to upgrade it. More on this procedure in the Null Chamber thread.

An Advancing Enemy:
For this, Leon asks you to scout out the Lawn Gnome encampments. There are three of them which will have red flags on your map on the PDA. On your map, they are the yellow, blue, and orange mushrooms directly to the west, (or left), of Leon and Dina.

Gnomish Battle Plans
Leon is convinced that the Lawn Gnomes are planning an attack and asks you to go get the little blue gnome that seems to be carrying messages back and forth from Gnome Man's Land to the various Gnome Majors and retrieve the notes he seems to be carrying. The little red flag will pop up again on the map at the likeliest location of the next Lawn Gnome Courier. Defeat the Lawn Gnome Courier, and return to Leon.

A Call To Arms
Leon asks you to go up to Barton Town to show Lieutenant Clara the alleged battle plans you have recently taken from the bleeding corpse of the Lawn Gnome Courier. Head to the North-eastern corner of Village Greens, and you will see an archway which you can activate by clicking on it with your mouse. Click it and it will take you into Barton Town. I know there are a lot of red question marks and flags floating around in that darkness, but just try to focus on why you're here in Barton Town and speak with Clara. After Clara questions Leon's intellectual capacity and discounts the battle plans you risked life and limb for as nothing more than mere crayon doodles, go back to Leon and give him the news. Break it to him easy.

Balance Of Power
In this one, Leon asks you to defeat the Lawn Gnome Majors. They are Major Catastrophe, Major Tragedy, and Major Disaster. They are the yellow gnomes you should have seen at each of the camps you scouted when doing the An Advancing Enemy quest. Once you defeat them and go back to Leon to tell him of your success, there will be a vigilante group of Lawn Gnomes bent on avenging their fallen Majors.

Remo
In this quest, Leon asks you to find Remo, one of the Barton Regulars. He is located to the left and down against the wall separating the Towns from Village Greens. What do you know? Remo apparently has no faith in Commander Leon as you quickly find out when he decides to put you through a test of his own. You get the idea that maybe Leon got his job from being the nephew, of a cousin, of an aunt, twice-removed by now? Me too.

Flamingo Hunt
Not too difficult as there are several squads of these fellas hanging out directly south of Remo. Just kill 10 of these and head back.

Shroom Heads
A little bit more difficult then the last one because this quest wants you to get a certain number of drops from the Mushroom Cannons instead of just killing a certain amount of them. However many Mushroom Cannons it's going to take varies. The best way to get this completed in a timely fashion is to lower your level to at least 1.7 if it's already higher than that and go defeat as many Mushroom Cannons as it takes until you get all of the mushroom heads.

Behind Enemy Lines
In this quest, you are sent to defeat the Lawn Gnome General. Currently, the normal setting is broken and the General will not attack you so you can finish the quest, so choose either HARD or easy. If you're in this guild, you will choose HARD if you know what's good for you. For this, you'll want to get a crew together to help spread out the damage dealt to each of you. If you have buffs at this time, use them. Once you defeat the Lawn Gnome General, you will be able to select a ring from Remo for your troubles.

Rings to choose from:
Bump
Slash
Fire Rain
Hornet's Nest
Hot Foot
Solar Rays
Coyote Spirit
Fitness
Keen Aye
Quicksand
Taunt
Pot Lid
Teflon Spray
Bandage (Which Leon should have given you by now anyways)
Diagnose
Meat
Wish

Lost Larry
This is where Remo wants you to go find Larry in Bill's Ranch. The game is attempting to tell you that you are now ready for the next level. If you've spent enough time in Village Greens and got yourself plenty of ring drops and orbs to level them up, then maybe you are. However, that's not where I'm going to send you. Up to the north of Village Greens, where you met Lieutenant Clara, is Barton Town. There are many different areas of Barton Town you need to explore before moving on because the NPC's of Barton Town have many quests to give you which you are going to be able to complete as you got through the rest of the game.
However, if you wish to anger me and feel my wrath, please, feel free to go to the southwest corner of Village Greens and exit through where the sidewalk ends into Bill's Ranch. I will be very disappointed if you did, but hey, it's quite alright to anger an evil Sith lord bent on galactic domination, right?


Well, we've finally explored all of Village Greens and have revealed the map. The numbers are written to show you the level of each cluster of enemies in that area.


User Image

while that's all helpful - the guide i'm compiling data for is how to make gold not questline related stuff sweatdrop

Quick Reply

Submit
Manage Your Items
Other Stuff
Get GCash
Offers
Get Items
More Items
Where Everyone Hangs Out
Other Community Areas
Virtual Spaces
Fun Stuff
Gaia's Games
Mini-Games
Play with GCash
Play with Platinum